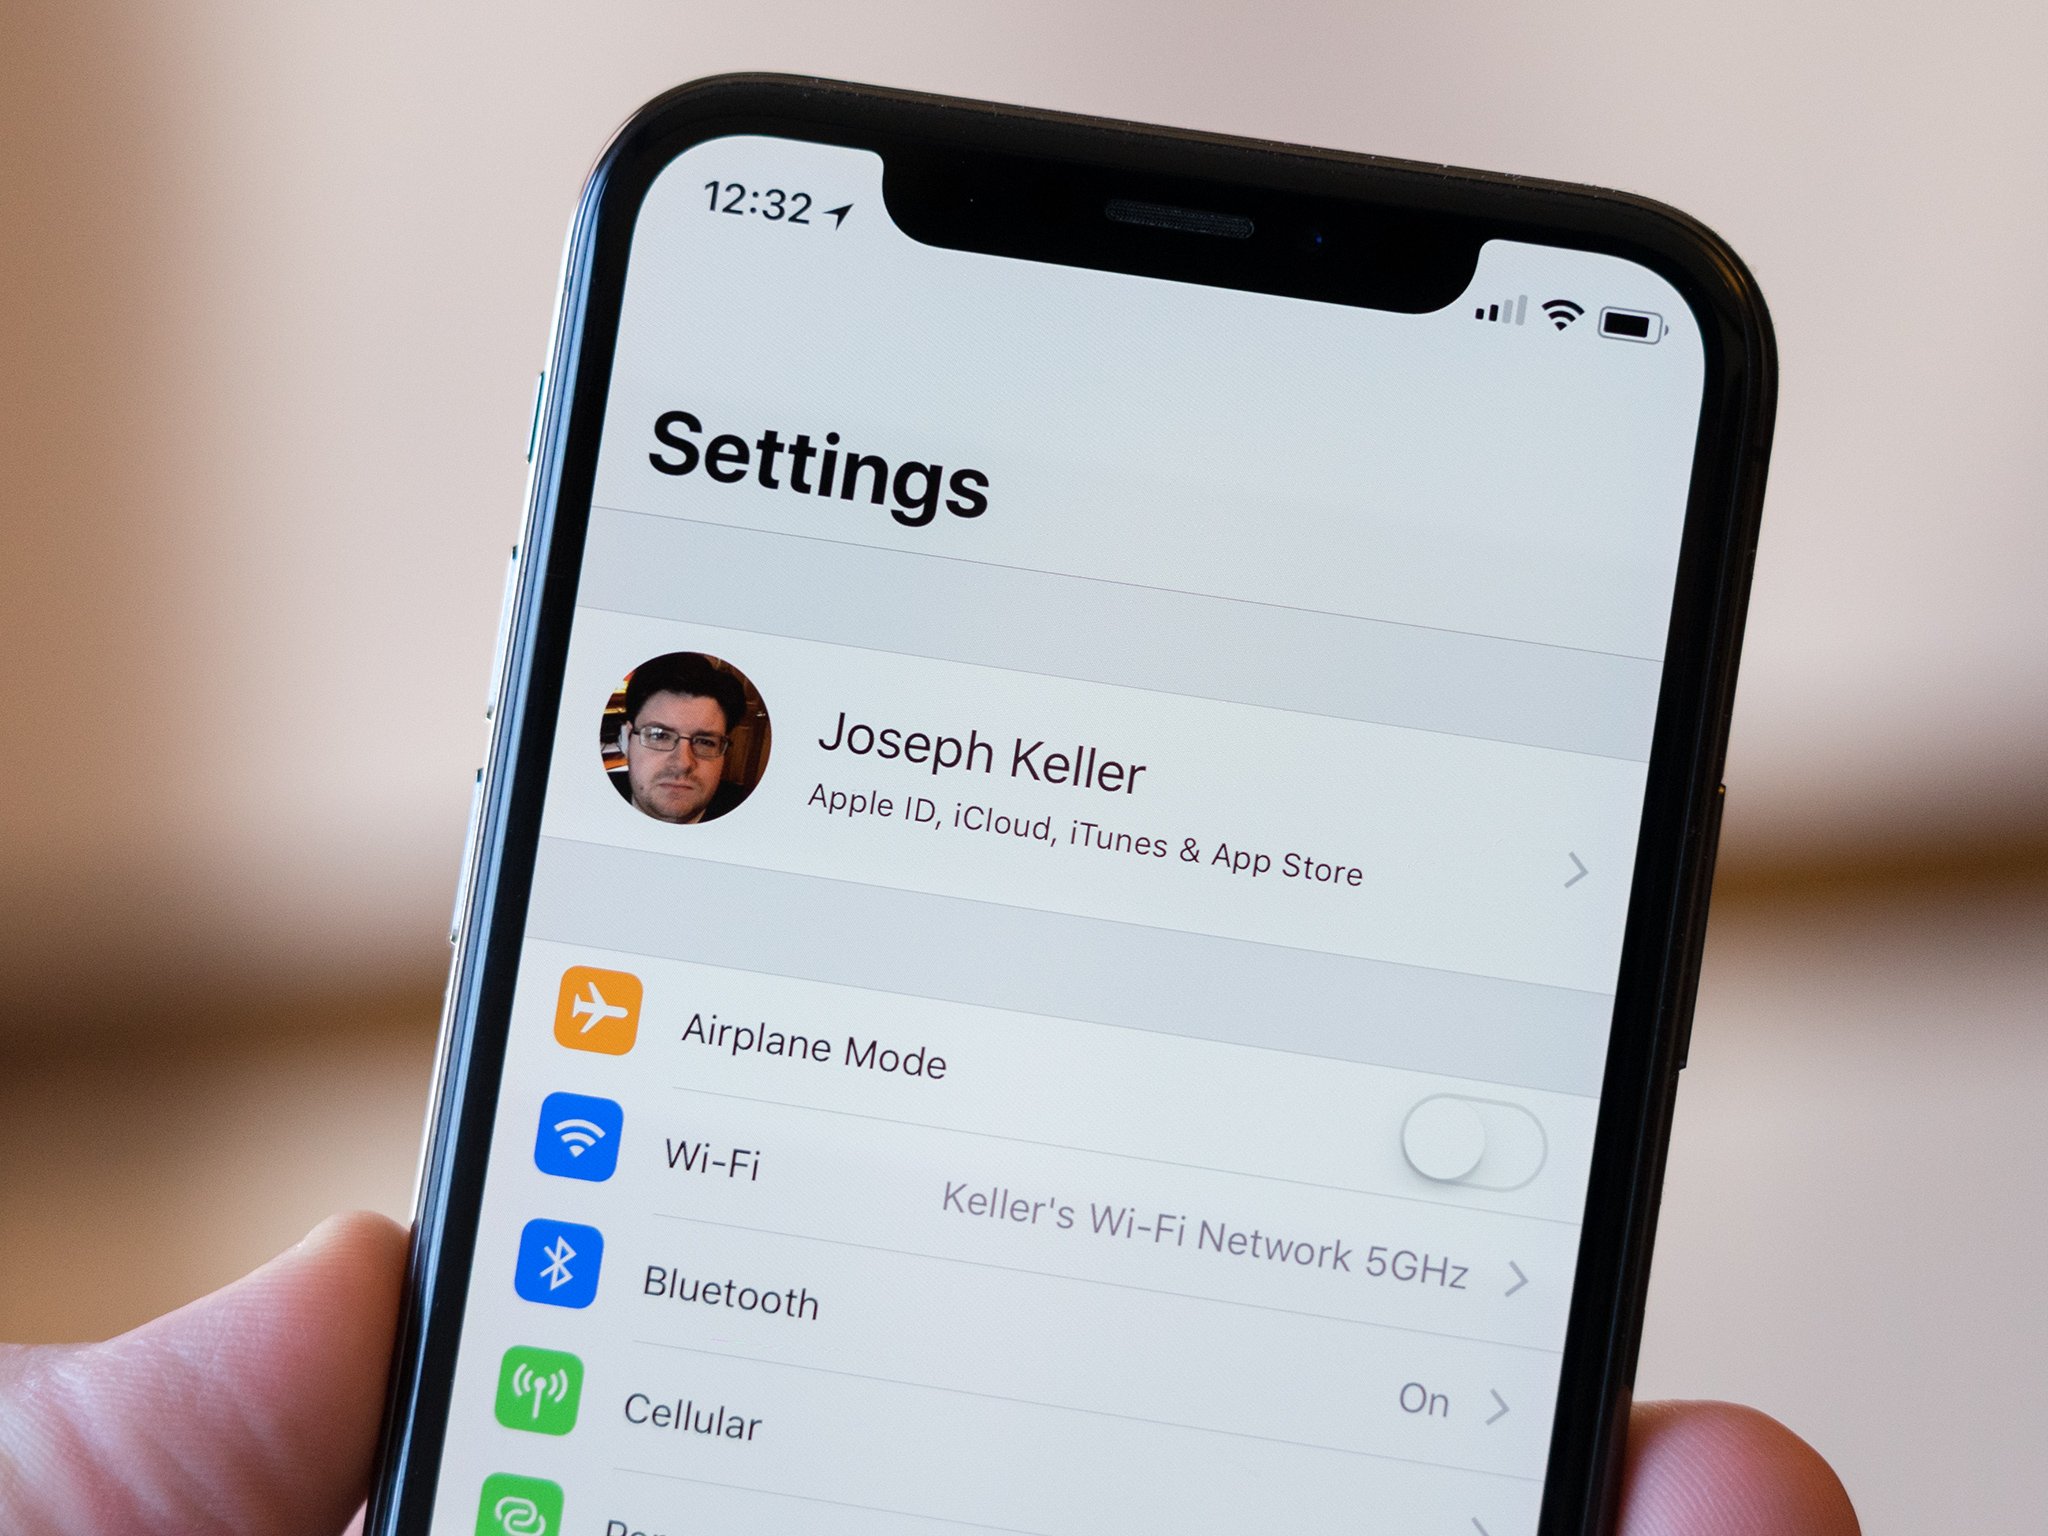
Need to switch Apple IDs on your iPhone? A few taps is all it takes!
- mar
- 14
- Posted by Michael
- Posted in Okategoriserade
Sometimes you may need to change the Apple ID being used on your iPhone or iPad. Thankfully, it's an easy task.
When you buy the current iPhone, iPad, or a new Mac, you're going to need an Apple ID. Your Apple ID is basically your ticket for all content in the Apple ecosystem, including services like Apple Music, Apple TV+, apps, and more. But maybe you need to have two Apple IDs, one for work and another for personal use. Or maybe you want to have a separate account for just content and downloads, while maintaining another for contacts and data. No matter what your reason may be, it's easy to switch between multiple Apple IDs on your devices.
This guide is for switching Apple IDs on your best iPhone or favorite iPad. If you are looking for how to change your Apple ID entirely, we have a separate guide for that as well.
What happens to the content when you switch Apple IDs
Depending on whether you keep content on your iPhone or iPad or erase it, some of your data will stay on your iPhone, even after you switch. For example, contacts, photos, and calendar events on your iPhone (and not only in iCloud) will remain. Apps, music, books, and podcast subscriptions will also stay on your iPhone, but updating them will be a problem if you're signed in to a different iTunes or App Store account than the one you purchased them on.
When signing in to a different Apple ID, you'll be able to merge the content on your iPhone with the iCloud data associated with the other Apple ID. So, if you signed out of a work Apple ID and want to keep your work contacts on the iPhone, save them to your iPhone and then merge them when you sign in to your personal Apple ID.
Step 1: Sign out of your current Apple ID
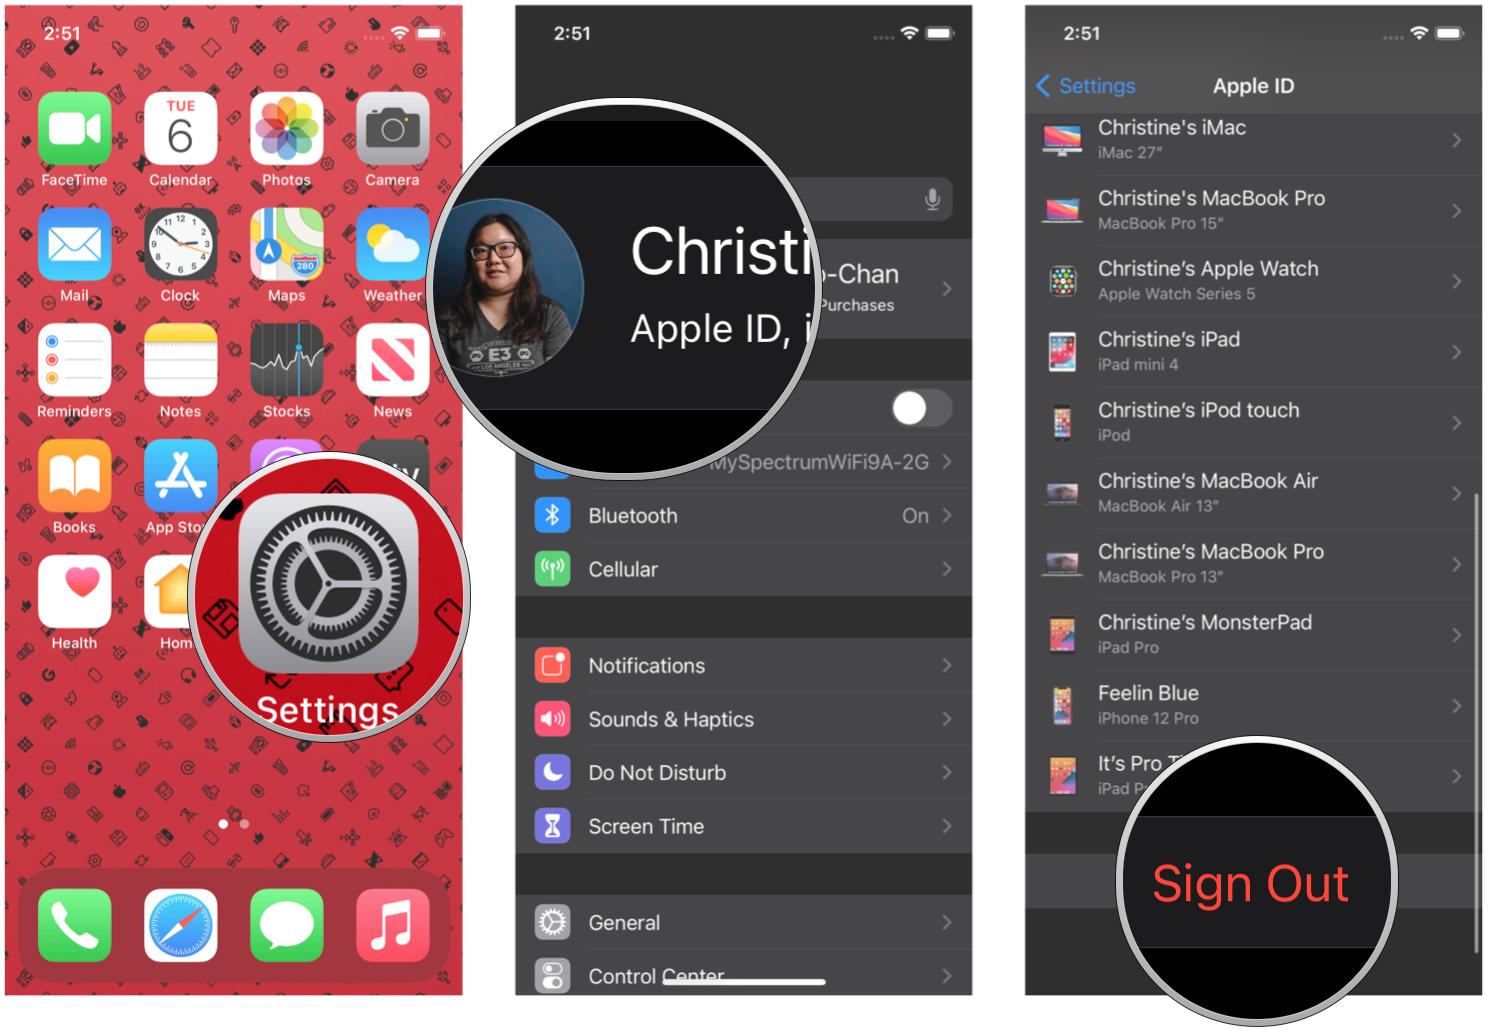
- Launch the Settings app on your iPhone or iPad.
- Tap your Apple ID banner at the top of the screen.
Scroll to the bottom and tap Sign Out.
- Tap Sign out of iCloud if you have different accounts for iCloud and the iTunes and App Stores. Otherwise, proceed to Step 5.
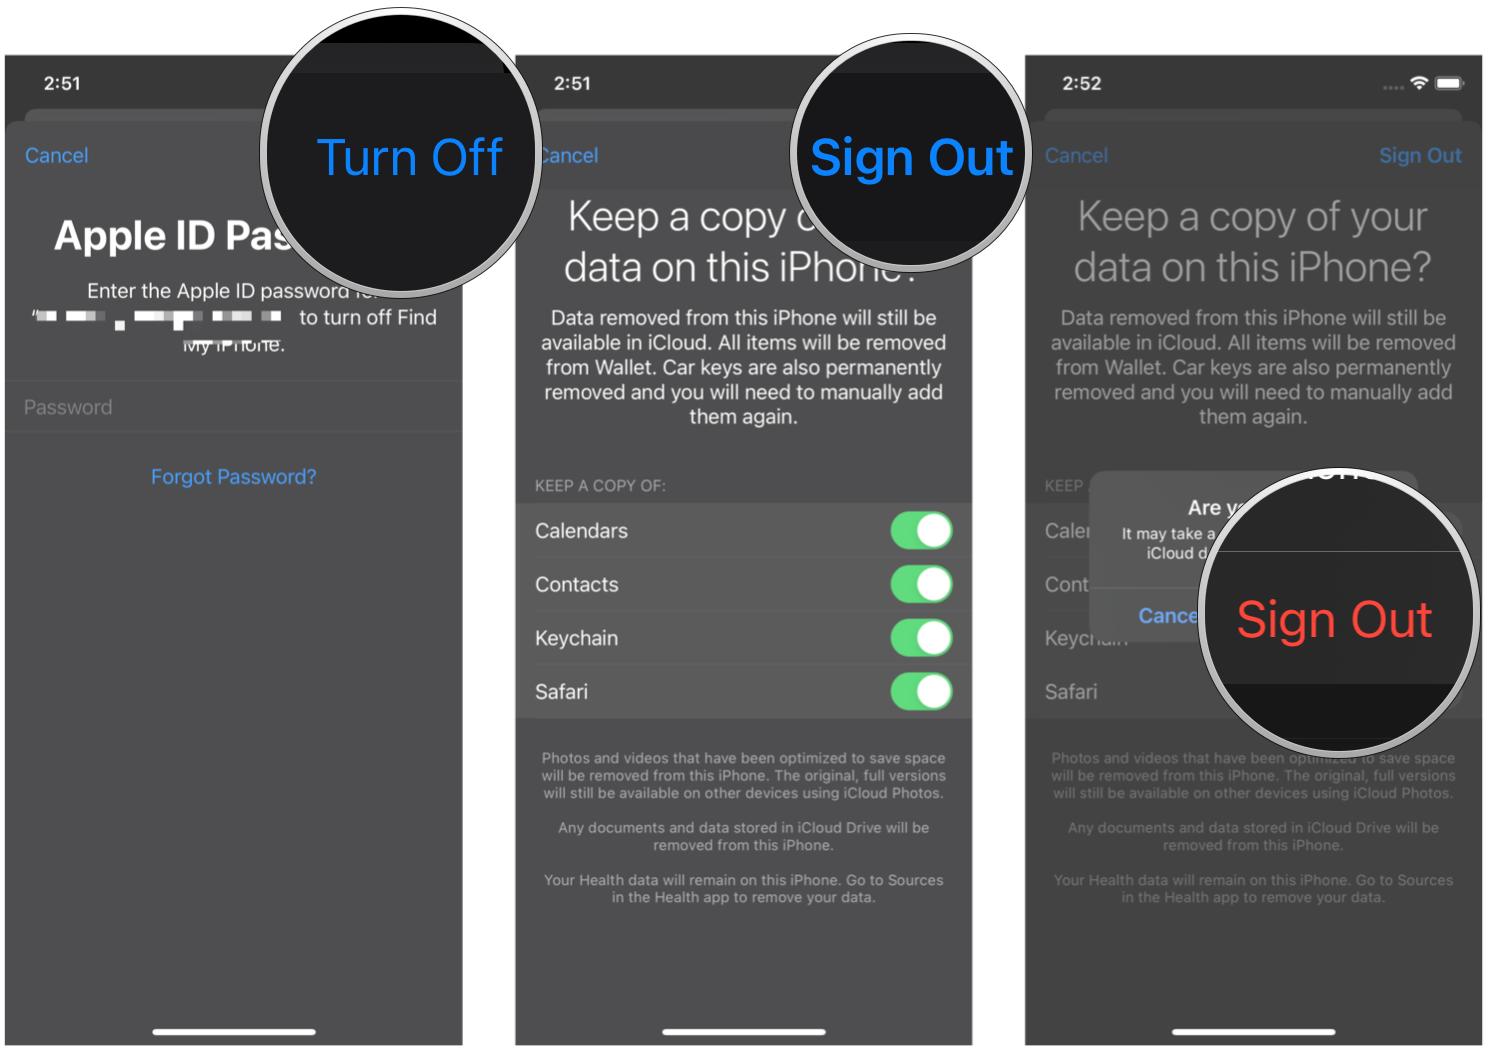
- Enter the password associated with your Apple ID.
- Tap Turn Off for Find My iPhone.
- Turn on the category for any data you want to save locally on your iPhone. Remember, when you switch accounts, the data on your iPhone will merge with the new Apple ID data.
- Tap Sign Out.
Tap Sign out again to confirm that you want to sign out.
Step 2: Sign in with a different Apple ID
Now you can sign in to your iPhone or iPad with a different Apple ID.
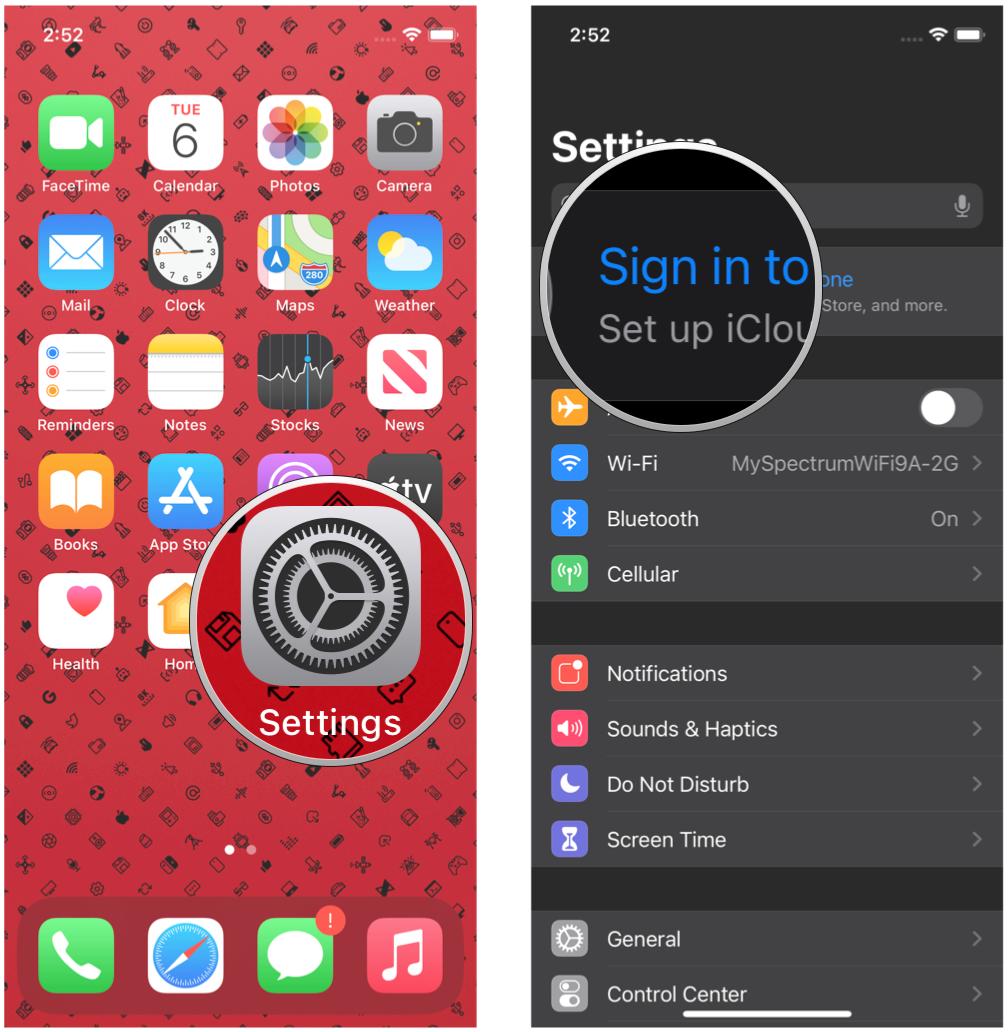
- Launch the Settings app on your iPhone or iPad.
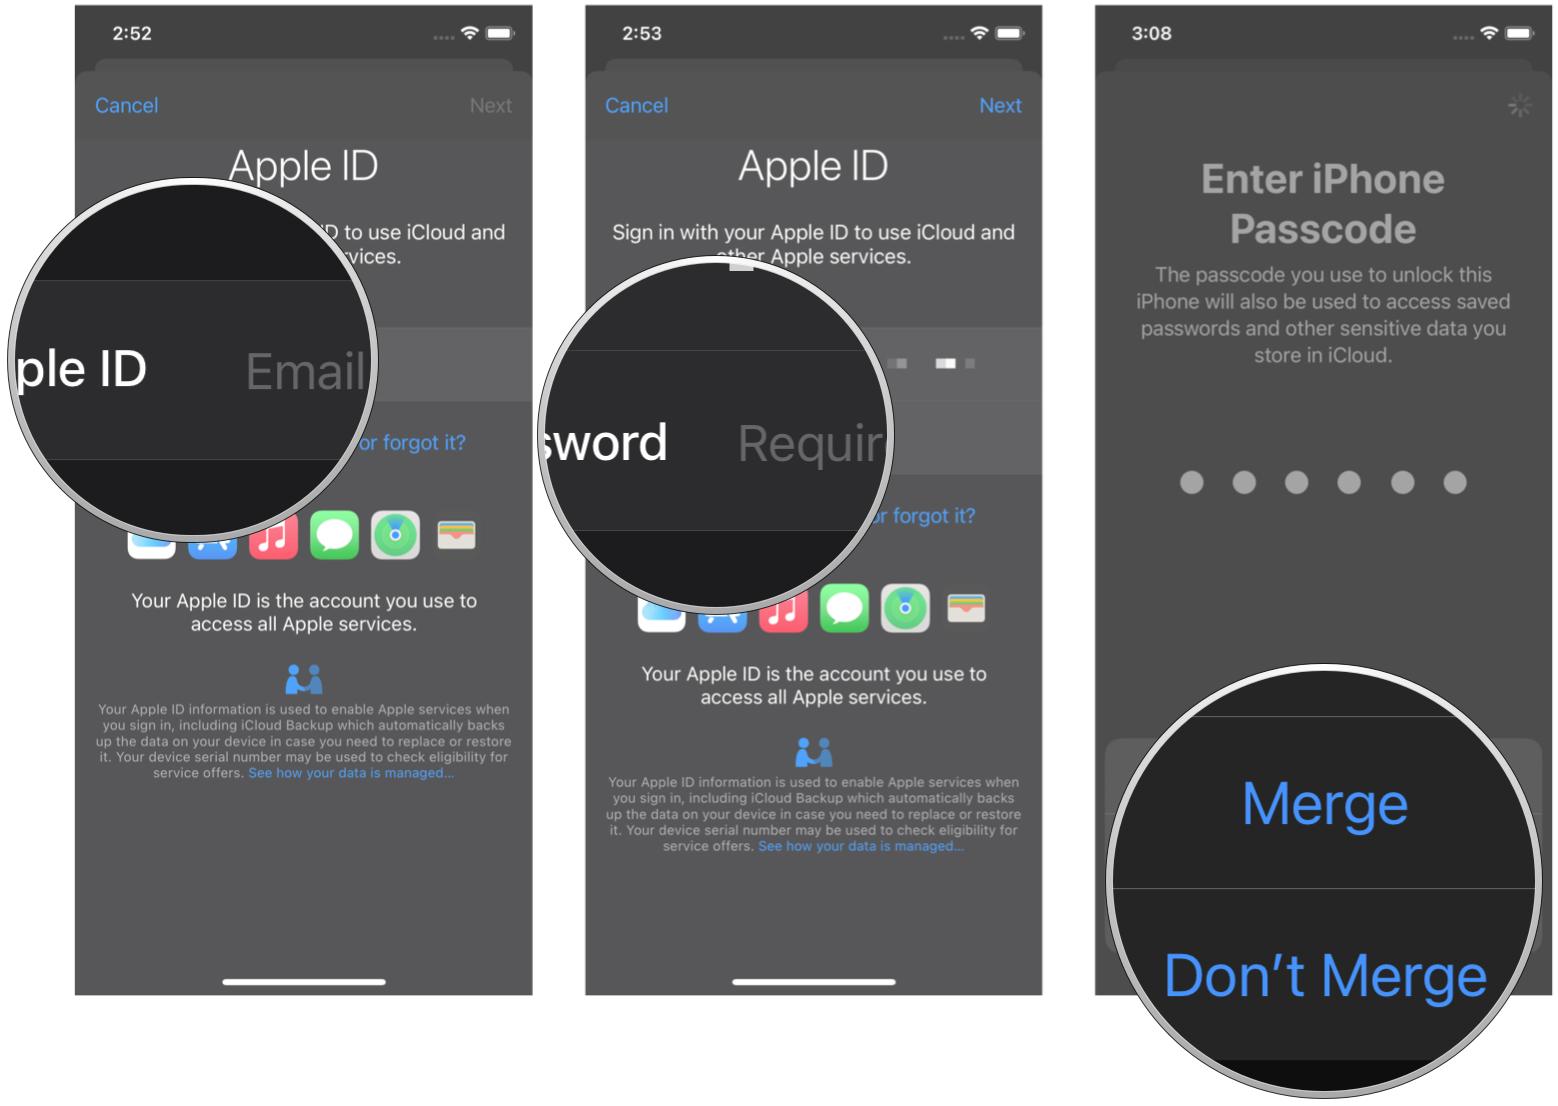
Tap Sign in to your iPhone (or iPad).
- Tap Email and enter the email address associated with the different Apple ID.
- Enter the Password associated with the different Apple ID.
Tap Merge if you want to merge the data on your iPhone with the iCloud account associated with the different Apple ID. Tap Don't Merge if you don't want the content on the iPhone uploaded to iCloud in the different Apple ID's account.
Step 3: Add a second Apple ID
If you use multiple Apple IDs, such as having one for personal use and the other for work, then you'll be glad to know that you can actually use more than one Apple ID on your device for things like email, contacts, notes, and more. Here's how to add that:
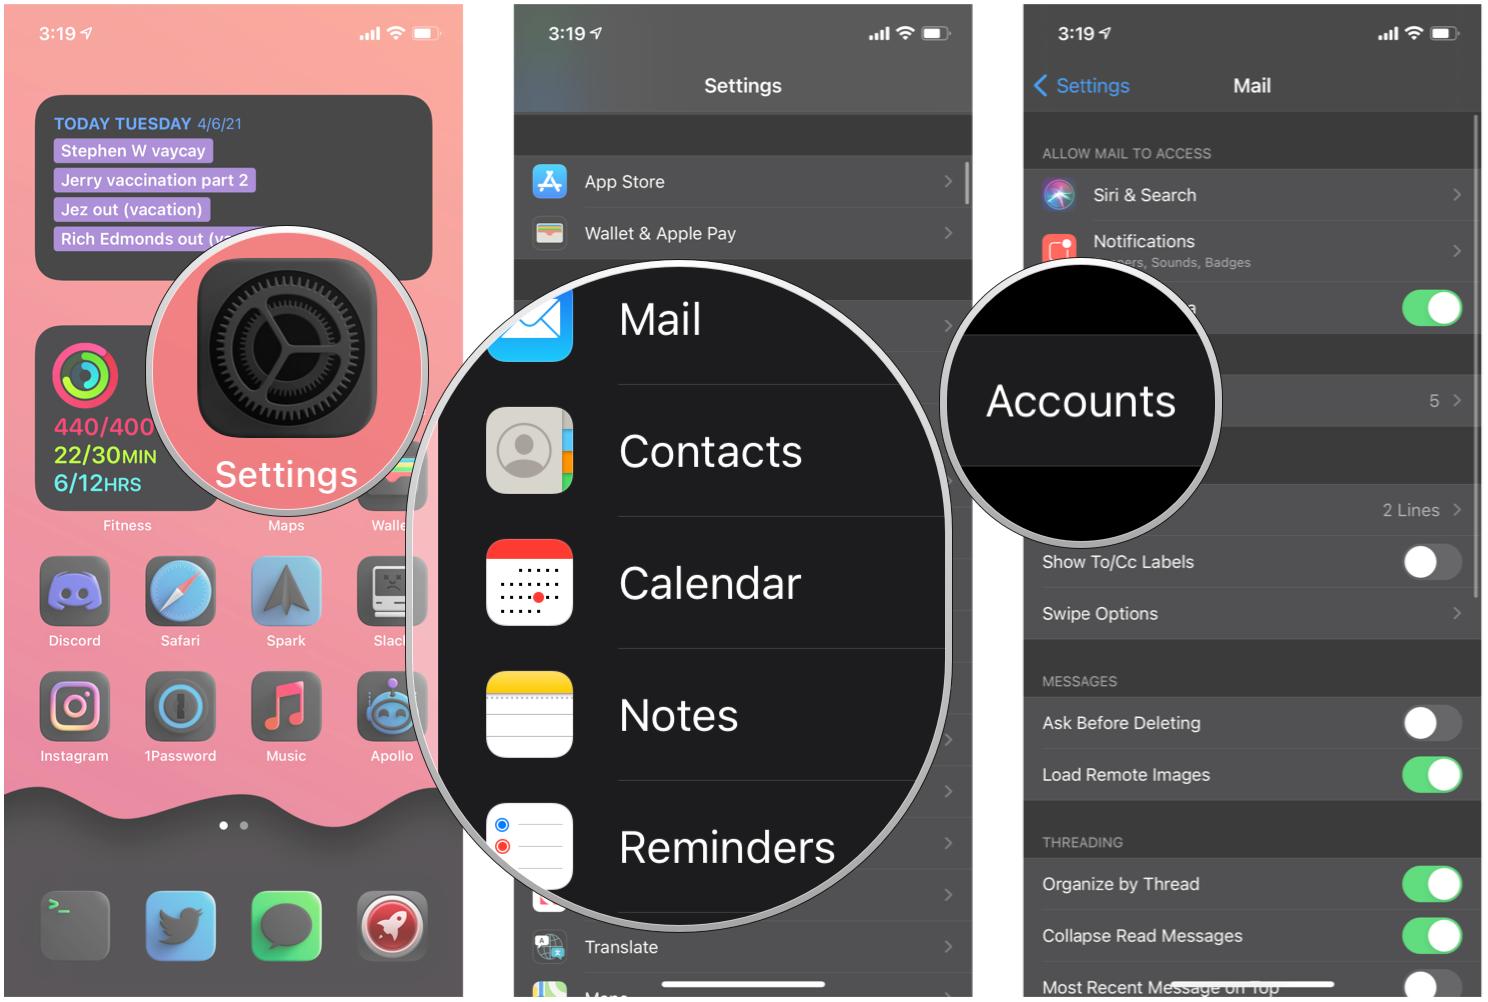
- Launch Settings.
- Scroll down and select one of the following: Mail, Contacts, Calendar, Notes, or Reminders.
Tap Accounts.
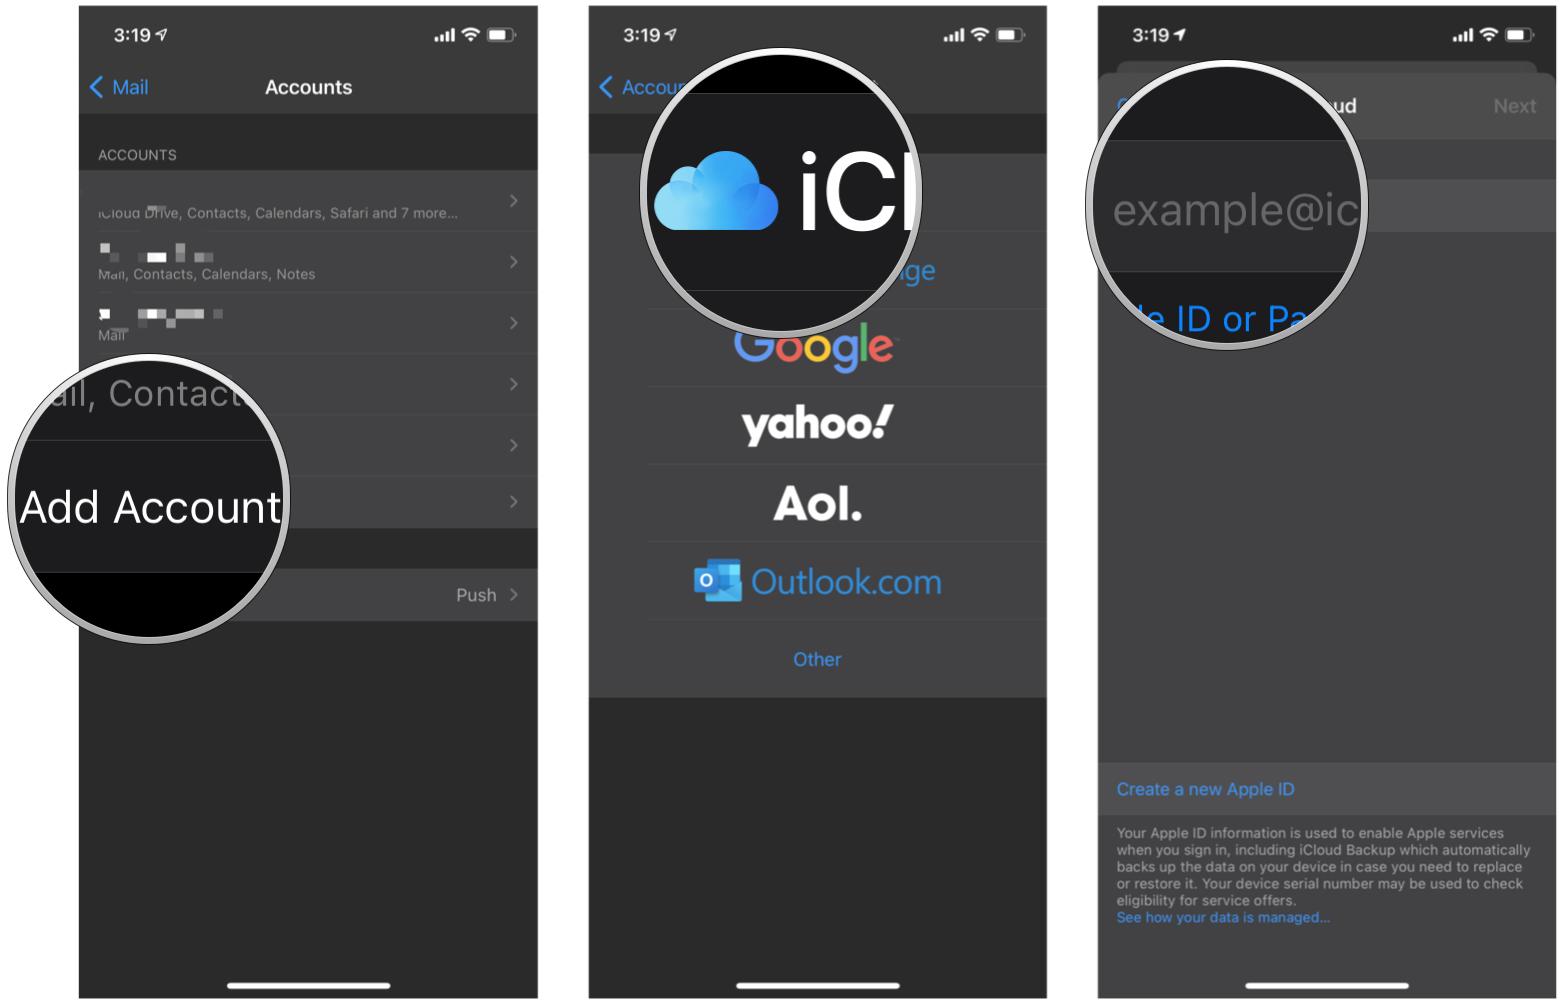
- Tap Add Account.
- Select iCloud.
- Type in your Apple ID email, then tap Next.
- Type in your password, then tap Next.
After verifying your info, select the services that you want to turn on.
On another note, it's highly recommended that you enable two-factor authentication on your Apple ID for an extra layer of security, especially if you use multiple accounts.
Ah, the good ol' switcheroo
As you can see, switching Apple IDs on iPhone and iPad is pretty easy and straightforward. There are many reasons why you may need to manage two Apple ID accounts on all of your devices, and it's a quick process. We do highly recommend using 2FA if you do (actually, in general), just for that extra security. You never know these days!
Updated March 2022: This information is up-to-date with the latest versions of iOS 15.
Senaste inläggen
- Macbook Air M4-benchmark har läckt – imponerar med nästan Macbook Pro-prestanda
- Apple förbereder integration av Google Gemini i Apple Intelligence
- Windscribe VPN – snabb och effektiv vpn för Mac
- Kalifornien nominerar Steve Jobs till den amerikanska innovationsdollarn
- Kalifornien nominerar Steve Jobs till den amerikanska innovationsdollarn
Senaste kommentarer
Arkiv
- februari 2025
- januari 2025
- september 2024
- augusti 2024
- juli 2024
- juni 2024
- maj 2024
- april 2024
- mars 2024
- februari 2024
- januari 2024
- december 2023
- november 2023
- oktober 2023
- september 2023
- augusti 2023
- juli 2023
- juni 2023
- maj 2023
- april 2023
- mars 2023
- februari 2023
- januari 2023
- december 2022
- november 2022
- oktober 2022
- september 2022
- augusti 2022
- juli 2022
- juni 2022
- maj 2022
- april 2022
- mars 2022
- februari 2022
- april 2021
- mars 2021
- januari 2021
- december 2020
- november 2020
- oktober 2020
- september 2020
- augusti 2020
- juli 2020
- juni 2020
- maj 2020
- april 2020
- mars 2020
- februari 2020
- januari 2020
- december 2019
- november 2019
- oktober 2019
- september 2019
- augusti 2019
- juli 2019
- juni 2019
- maj 2019
- april 2019
- mars 2019
- februari 2019
- januari 2019
- december 2018
- november 2018
- oktober 2018
- september 2018
- augusti 2018
- juli 2018
- juni 2018
- maj 2018
- april 2018
- mars 2018
- februari 2018
- januari 2018
- december 2017
- november 2017
- oktober 2017
- september 2017
- augusti 2017
- juli 2017
- juni 2017
- maj 2017
- april 2017
- mars 2017
- februari 2017
- januari 2017
- december 2016
- november 2016
- oktober 2016
- september 2016
- augusti 2016
- juli 2016
- juni 2016
- maj 2016
- april 2016
- mars 2016
- februari 2016
- januari 2016
- december 2015
- november 2015
- oktober 2015
- september 2015
- augusti 2015
- juli 2015
- juni 2015
- maj 2015
- april 2015
- mars 2015
- februari 2015
- januari 2015
- december 2014
- november 2014
- oktober 2014
- september 2014
- augusti 2014
- juli 2014
- juni 2014
- maj 2014
- april 2014
- mars 2014
- februari 2014
- januari 2014
Kategorier
- –> Publicera på PFA löp
- (PRODUCT) RED
- 2015
- 25PP
- 2nd gen
- 32gb
- 3D Touch
- 3D-kamera
- 4k
- 64gb
- 9to5mac
- A10
- A9X
- Aaron Sorkin
- Accessories
- adapter
- AirPlay
- AirPods
- Aktiv
- Aktivitetsarmband
- Aktuellt
- Alfred
- Allmänt
- AMOLED
- Android Wear
- Angela Ahrendts
- Ångerätt
- Animal Crossing
- Animal Crossing New Horizons
- announcements
- Ansiktsigenkänning
- app
- App Store
- Appar
- Apple
- Apple Beta Software Program
- Apple Book
- Apple CarPlay
- Apple Event
- Apple iMac
- Apple Inc
- Apple Inc, Consumer Electronics, iCloud, iOS, iPhone, Mac, Mobile, Personal Software, Security Software and Services
- Apple Inc, iCloud
- Apple Inc, iOS
- Apple Inc, Mobile Apps
- Apple Inc, Monitors
- Apple Mac Mini
- Apple Macbook
- Apple MacBook Air
- Apple MacBook Pro
- Apple Macos
- Apple Maps
- Apple Music
- Apple Music Festival
- Apple Music Radio
- Apple Offer
- Apple Online Store
- Apple Park
- Apple Pay
- Apple Pencil
- Apple Podcast
- Apple Store
- Apple Store 3.3
- Apple TV
- apple tv 4
- Apple TV 4K
- Apple Watch
- Apple Watch 2
- Apple Watch 8
- Apple Watch 9
- Apple Watch Apps
- Apple Watch SE
- Apple Watch Series 2
- Apple Watch Sport
- Apple Watch Ultra
- Apple Watch, Headphones
- Apple Watch, iPhone
- AppleCare
- AppleTV
- Application
- Applications
- Apps
- AppStore
- Apptillägg
- Apptips
- AppTV
- April
- Arbetsminne
- armband
- Art Apps
- Återköp
- återvinning
- Åtgärdsalternativ
- atvflash
- Audio Apps
- Augmented REality
- Back-to-school
- Bakgrundsbilder
- BankId
- Barn
- Batteri
- batteriskal
- batteritid
- Beats
- Beats 1
- Beats Solo 2 Wireless
- Beats Solo2
- Bebis
- Beginner Tips
- Belkin
- Bendgate
- beta
- Beta 3
- betaversion
- betaversioner
- bilddagboken.se
- bilder
- bilhållare
- billboard
- Bioteknik
- Blendtec
- Bloomberg
- Bloons TD 5
- Bluelounge
- Bluetooth
- Böj
- Booking.com
- Borderlinx
- bose
- bugg
- Buggar
- Buggfixar
- Butik
- C More
- Calc 2M
- Camera
- Camera Apps
- Campus 2
- Canal Digital
- Carpool Karaoke
- Caseual
- Catalyst
- CES 2015
- Chassit
- Chip
- Chrome Remote Desktop
- Chromecast
- citrix
- clic 360
- CNBC
- Computer Accessories
- Computer Accessories, Laptop Accessories
- Connect
- Cydia
- Dagens app
- Dagens tips
- Damm
- Danny Boyle
- Data
- datamängd
- Datorer
- Datortillbehör
- Datum
- Defense
- Dekaler
- Designed by Apple in California
- Developer
- Development
- Digital Inn
- Digital Touch
- Digitalbox
- DigiTimes
- Direkt
- Discover
- display
- DisplayMate
- Dive
- Docka
- Dräger 3000
- Dropbox
- Droples
- DxOMark
- E-post
- earpod
- EarPods
- Earth Day
- Eddie Cue
- eddy cue
- Educational Apps
- Ekonomi
- Ekonomi/Bransch
- El Capitan
- Elements
- ElevationLab
- Elgato Eve
- Elgato Eve Energy
- EM 2016
- Emoji
- emojis
- emoticons
- Enligt
- Entertainment Apps
- EU
- event
- Eventrykten
- EverythingApplePro
- Faceshift
- facetime
- Fäste
- Featured
- Features
- Feng
- Film / Tv-serier
- Filmer
- Filstorlek
- Finance Apps
- Finder For AirPods
- Finland
- FireCore
- Fitbit
- Fitness Accessories
- Fjärrstyr
- Flurry
- Födelsedag
- fodral
- Förboka
- Force Touch
- förhandsboka
- Första intryck
- Forumtipset
- foto
- FoU (Forskning och Utveckling)
- Fource Touch
- Foxconn
- FPS Games
- Framtid
- Fre Power
- Frontpage
- Fullt
- Funktioner
- Fuse Chicken
- Fyra
- Gadgets
- Gagatsvart
- Gamereactor
- Games
- Gaming
- Gaming Chairs
- Gästkrönika
- General
- Gigaset
- Gitarr
- Glas
- GM
- Google Maps
- Google Now
- gratis
- grattis
- Guide
- Guider
- Guider & listor
- Guld
- hack
- Halebop
- hållare
- Hälsa
- Hårdvara
- HBO
- HBO Nordic
- Health
- Health and Fitness
- Health and Fitness Apps
- Hej Siri
- Helvetica Neue
- Hemelektronik
- Hemknapp
- Hemlarm
- Hermes
- Hitta min iphone
- Hjärta
- högtalare
- HomeKit
- HomePod
- Homepod Mini
- hörlurar
- htc
- Hue
- Humor
- i
- I Am A Witness
- IBM
- iBolt
- iBomber
- iBook
- icar
- iCloud
- iCloud Drive
- iCloud Voicemail
- iCloud.com
- iDevices
- IDG Play
- idownloadblog
- iFixit
- ikea
- iKörkort
- iLife
- Illusion Labs
- iMac
- IMAP
- iMessage
- iMessages
- iMore Show
- Incipio
- InFuse
- Inspelning
- Instagram-flöde
- Instrument
- Intel
- Internet/Webbtjänster
- iOS
- iOS 10
- iOS 12
- iOS 17
- iOS 18
- iOS 5
- iOS 7
- iOS 8
- iOS 8 beta
- iOS 8.1.3
- iOS 8.2
- iOS 8.3
- iOS 8.4
- iOS 8.4.1
- iOS 9
- iOS 9 beta 4
- iOS 9.1
- iOS 9.1 beta 2
- iOS 9.2
- iOS 9.2.1
- iOS 9.3
- IOS Games
- ios uppdatering
- iOS, iPad, MacOS
- iOS, iPhone
- ios9
- iPad
- iPad Accessories
- iPad Air
- iPad Air 2
- iPad Air 3
- iPad Air 5
- iPad Apps
- iPad Mini
- iPad mini 4
- iPad Mini 6
- iPad mini retina
- iPad Pro
- iPad, iPhone, Mac
- iPad, iPhone, Mobile Apps
- iPad, iPhone, Streaming Media
- iPados
- iphone
- iPhone 12
- iPhone 14
- iPhone 14 Pro
- iPhone 15
- iPhone 16
- iPhone 17
- iPhone 5
- iPhone 5S
- iPhone 5se
- iPhone 6
- iphone 6 plus
- iPhone 6c
- iPhone 6s
- iPhone 6S plus
- iPhone 7
- iPhone 7 display
- iPhone 7 Plus
- iPhone 7s
- iPhone Accessories
- iPhone Apps
- iPhone Cases
- iPhone SE
- iphone x
- iPhone XS
- iPhone XS Max
- iPhone, Mobile Apps
- iPhone7
- iPhoneGuiden
- iPhoneguiden.se
- iPhones
- iPod
- iPod Nano
- iPod shuffle
- ipod touch
- iSight
- iTunes
- iWatch
- iWork
- iWork för iCloud beta
- Jailbreak
- James Corden
- Jämförande test
- Jämförelse
- Jet Black
- Jet White
- Jönssonligan
- Jony Ive
- Juice Pack
- Juridik
- Just mobile
- kalender
- kalkylator
- Kamera
- Kameratest
- Karriär/Utbildning
- Kartor
- Kevin Hart
- keynote
- Keynote 2016
- KGI
- KGI Security
- Kina
- Klassiskt läderspänne
- Kod
- Kollage
- koncept
- konceptbilder
- köpguide
- krasch
- Krascha iPhone
- Krönika
- Kvartalsrapport
- Laddhållare
- laddningsdocka
- Laddunderlägg
- läderloop
- lagar
- Lagring
- Lajka
- Länder
- lansering
- laserfokus
- Layout
- leather loop
- LG
- Liam
- Lifeproof
- Lightnigport
- lightning
- Linux
- LinX
- live
- Live GIF
- Live Photos
- Live-event
- Livsstil
- Ljud & Bild
- Logitech
- LOL
- Lösenkod
- Lösenkodlås
- Lovande spel
- LTE
- Luxe Edition
- M3
- M3TV
- Mac
- Mac App Store
- Mac Apps
- Mac Mini
- Mac OS
- Mac OS X
- Mac OS X (generellt)
- Mac OS X Snow Leopard
- Mac Pro
- Mac, MacOS
- Mac, Online Services
- Mac, Security Software and Services
- Macbook
- Macbook Air
- Macbook Pro
- MacBook, MacOS
- Macforum
- Macintosh
- macOS
- MacOS, Security Software and Services
- Macs
- MacWorld
- Made for Apple Watch
- magi
- Magic
- MagSafe
- Martin Hajek
- matematik
- Meddelanden
- Media Markt
- Medieproduktion
- Mediocre
- Messaging Apps
- Messenger
- MetaWatch
- Mfi
- Michael Fassbender
- microsoft
- Mikrofon
- Minecraft
- Ming-Chi Kuo
- miniräknare
- minne
- Mixer
- Mixning
- Mjukvara
- mobbning
- Mobile Apps
- Mobile Content
- Mobilt
- Mobilt/Handdator/Laptop
- Mobiltelefon
- Mockup
- Mophie
- mors dag
- moto 360
- Motor
- MTV VMA
- multitasking
- Music
- Music Apps
- Music, Movies and TV
- Musik
- Musikmemon
- MW Expo 2008
- native union
- Nätverk
- Navigation Apps
- nedgradera
- Netatmo Welcome
- Netflix
- Netgear Arlo
- News
- Niantic
- Nike
- Nikkei
- Nintendo
- Nintendo Switch
- Nöje
- Norge
- Notis
- Notiscenter
- nya färger
- Nyfödd
- Nyheter
- Officeprogram
- Okategoriserade
- OLED
- omdöme
- Omsättning
- OS X
- OS X El Capitan
- OS X Mavericks
- OS X Yosemite
- Outlook
- Övrig mjukvara
- Övrigt
- PanGu
- papper
- patent
- PC
- pebble
- Pebble Smartwatch
- Pebble Steel
- Pebble Time
- Pebble Time Steel
- Persondatorer
- Petter Hegevall
- PewDiePie
- Philips
- Philips Hue
- Phones
- Photoshop
- Planet of the apps
- Plex
- Pluggar
- Plus
- Plusbox
- Podcast
- Podcast Apps
- Pokemon
- Pokemon Go
- Policy
- Porträttläge
- PP
- Pris
- priser
- problem
- Problems
- Productivity Apps
- Program
- Prylar & tillbehör
- Publik
- publik beta
- QuickTime
- räkenskapsår
- räkna
- ram
- RAM-minne
- Rapport/Undersökning/Trend
- Rea
- Reading Apps
- recension
- Red
- reklaamfilm
- reklam
- reklamfilm
- reklamfilmer
- rekord
- Rendering
- reparation
- Reportage
- Reptest
- ResearchKit
- Retro
- Review
- Ring
- Ringa
- Rocket Cars
- Rosa
- Rumors
- Rumours
- RunKeeper
- rykte
- Rykten
- Safir
- Säkerhet
- Säkerhetsbrist
- Samhälle/Politik
- samsung
- Samtal
- San Francisco
- SAP
- security
- Series 2
- Servrar
- Shigeru Miyamoto
- Sia
- Simulation Games
- Siri
- SJ Min resa
- skal
- Skal iPhone 6
- skal iPhone 6s
- skärm
- SKärmdump
- Skärmglas
- Skribent
- skribenter medarbetare
- Skriva ut
- skruvmejsel
- skydd
- Skyddsfilm
- Skype
- slice intelligence
- Smart
- smart hem
- Smart Home
- Smart Keyboard
- Smart klocka
- Smart Lights
- smartphone
- Smartwatch
- SMS
- Snabbt
- Snapchat
- Social Apps
- Software
- Solo2
- sommar
- Sonos
- Sony
- soundtouch
- Space Marshals
- spår
- Speakers
- Special Event
- Spel
- Spelkonsol
- Spellistor
- Split Screen
- Split View
- Sport
- Sportband
- Sports Apps
- spotify
- Spring forward
- Statistik
- Steve Jobs
- Stickers
- Stockholm
- Stor iPhone
- Storlek
- Story Mode
- Strategy Games
- streama
- Streaming
- Streaming Devices
- Streaming Media
- stresstest
- Ström
- Studentrabatt
- stylus
- Super Mario Run
- support
- Surf
- Surfplatta
- svenska
- sverige
- Sverigelansering
- Switch
- Systemstatus
- Systemutveckling
- tåg
- Taig
- Tangentbord
- Taptic Engine
- Tårta
- tät
- Tävling
- Taylor Swift
- Teknik
- tele 2
- Telefoner
- Telekom
- Telia
- Test
- Tid
- TikTok
- Tile
- tillbehör
- Tim Cook
- TIME
- TimeStand
- Tiny Umbrella
- Tips
- Toppnyhet IDG.se
- Touch ID
- TouchID
- tower defence
- trådlös laddning
- Trådlösa hörlurar
- trådlöst
- trailer
- Travel Apps
- Tre
- TrendForce
- TripAdvisor
- Trolleri
- trump
- TSMC
- Tum
- tv
- TV Apps
- tvätta
- tvOS
- tvOS 9.2
- tvOS beta 2
- Tweak
- Typsnitt
- Ubytesprogram
- UE MegaBoom
- Unboxing
- Underhållning/Spel
- unidays
- United Daily News
- Unix
- Updates
- Uppdatera
- uppdatering
- Upplösning
- upptäckt
- USA
- Ut på Twitter
- utbyte
- utbytesprogram
- Utilities Apps
- Utlottning
- utrymme
- utvecklare
- varumärke
- Vatten
- Vattentålig
- vattentät
- vävt nylon
- Verktyg
- Viaplay
- Vibrator
- video
- Videoartiklar och webb-tv (M3/TW/CS)
- Villkor
- viloknapp
- Virtual Reality
- Virus
- visa
- Vision Pro
- VLC
- Volvo on call
- VPN
- W1
- Waitrose
- Watch OS
- WatchOS
- WatchOS 2
- watchOS 2.0.1
- watchOS 2.2
- Webbtv (AppTV)
- wi-fi
- Wifi-samtal
- Windows
- Windows 8
- WWDC
- WWDC2015
- yalu
- Youtube
- Zlatan

